DocuSign is an industry standard application platform for collecting digital signatures on important documents. If you’re using a custom Claris FileMaker solution to help run your business, and DocuSign for collecting digital signatures, you should consider integrating the two systems. By using FileMaker’s Insert from URL script step, and the very robust DocuSign REST API, you can realize some operational efficiencies that are pretty amazing.
To see an example of what we’re talking about, check out this video demo of a custom Claris FileMaker solution that is integrated with DocuSign.
DocuSign Account Configuration
To achieve this integration, we first need to configure our DocuSign account for API access. We’ll need to be a DocuSign admin for the organization, and we’ll need to upgrade our account to a developer tier to enable API access. Fortunately, there’s a free tier that allows us to experiment without limits, but note that all documents created with the free tier will be watermarked as “demonstration document only”. DocuSign Pricing
Once we have enabled our developer account (free or otherwise), navigate to the developer dashboard and locate the Apps and Keys page. On this page, select “Add App and Integration Key”, give the new app a name, select Implicit Grant in the Authentication section, and add a Redirect URI. The redirect URI can point to any valid web page (I used www.codence.com). Copy the integration key, we will need this in the next step.
The DocuSign API
The DocuSign API is very well documented. In this example, we are referring to the eSignature REST API v2.1, specifically the sections on envelopes and authenticating with an Implicit Grant.
Authenticating to DocuSign
With the Implicit Grant method, we’re going to use a web viewer to authenticate to DocuSign. The URL for the web viewer should look something like this:
| https://account-d.docusign.com/oauth/auth?response_type=token&scope=signature&client_id=014ad42c-824e-4365-n233-59445eba1687&redirect_uri=https://www.codence.com |
The client_id in this URL is the integration key from above. When we point the web viewer at this URL we’ll get a DocuSign branded authentication page where our user enters an email and password. Once we login with our credentials, we’ll be redirected to the redirect_uri specified. Buried in the source of this page is an access token that we’ll need to capture. We’ll use the FileMaker function GetLayoutObjectAttribute ( “webViewerName”; “source” ) to capture the source of the results page and parse out the access token and its expiration time.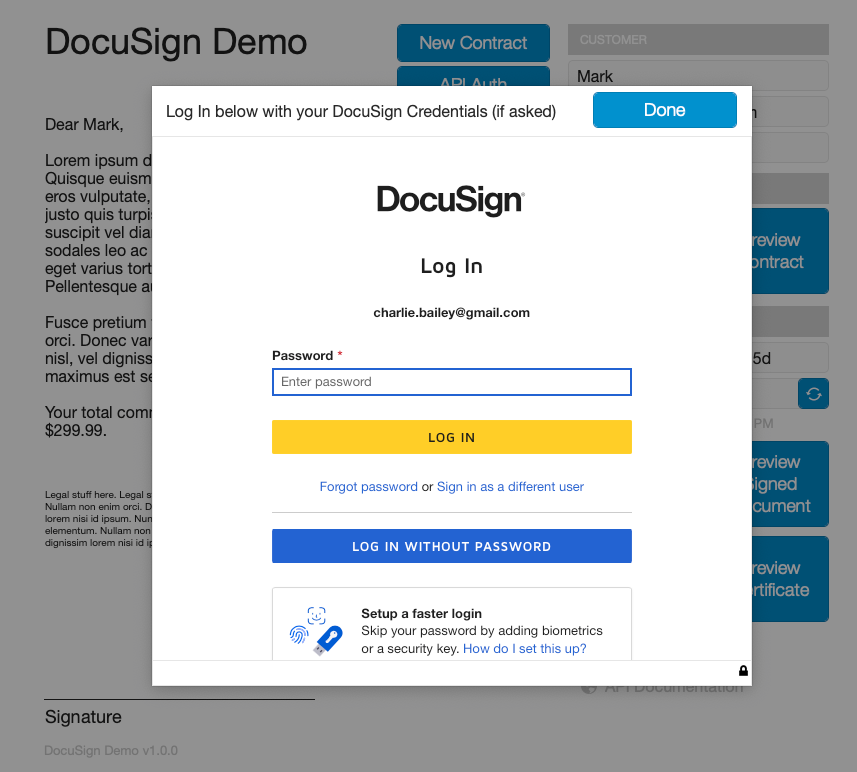
Web Viewer Source
We’ll use this access token in all subsequent API requests, and we’ll also want to compute an expiration timestamp based on the timestamp of the above authentication request, and the expires_in (seconds) parameter that we parsed. We’ll want to keep an eye on this timestamp and get a new token once the current one has expired.
Use text parsing functions to capture the token and expiration time from the web viewer source: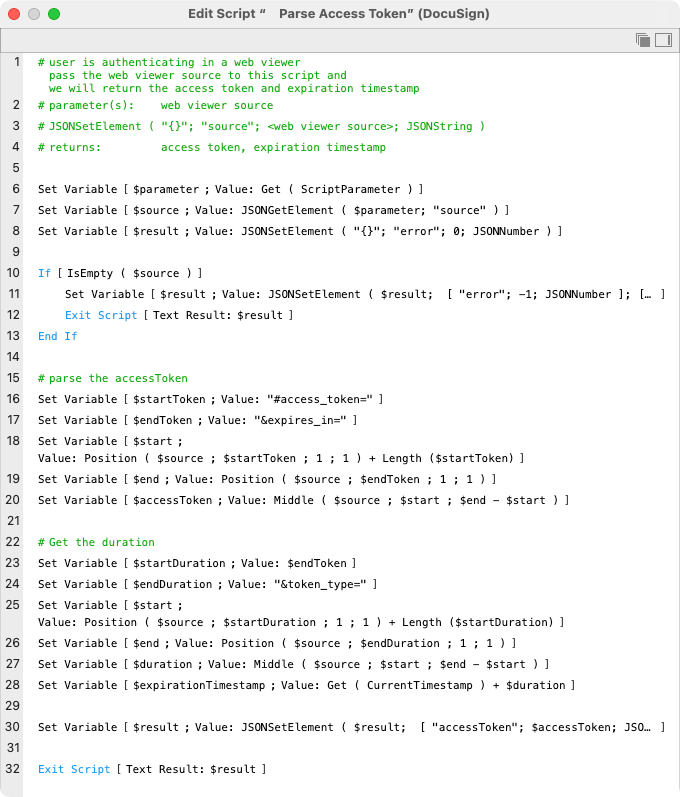
Preparing the FileMaker Layout
In this example, we are going to use a FileMaker layout to prepare our document to be signed. We will save it as a PDF and then upload it to DocuSign. We need to configure our layout so that we can instruct DocuSign where to ask for a signature. DocuSign allows us to define tags that we can embed in our PDF to indicate where we want our DocuSign user to interact with the document. These tags are just text strings, and we will use white text for these so that they’re not visible in our document.
<!––>
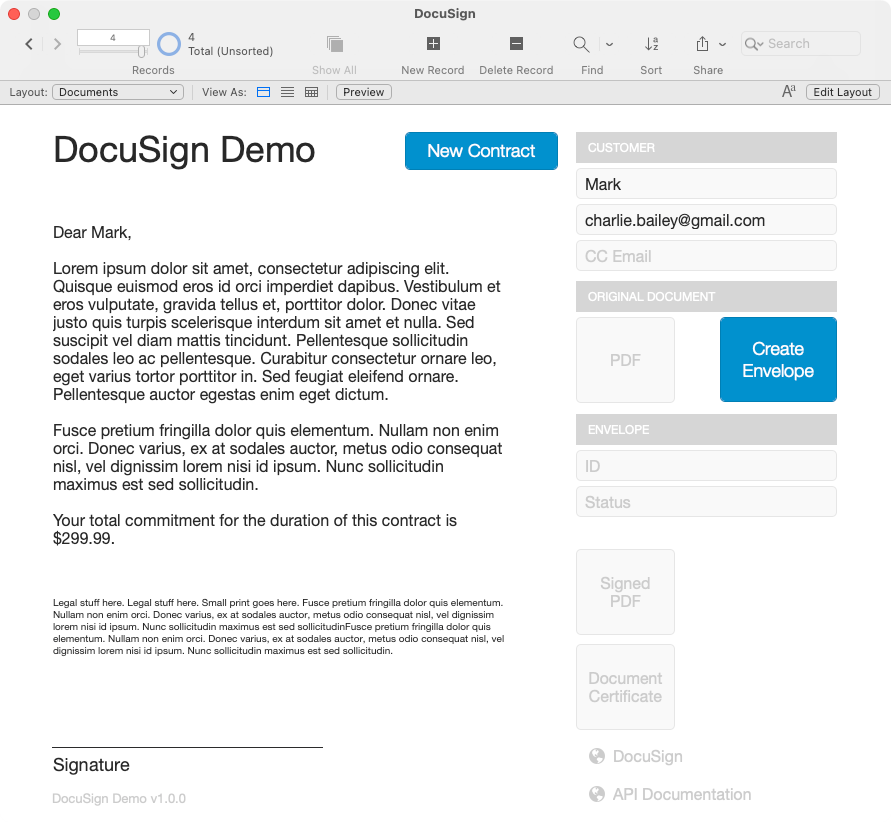
Here is our document in layout mode. Note the white text tags indicating where we want our DocuSign user to initial, and sign the document. We have temporarily changed the background of the layout part to a darker shade so that the white tags are visible in this screenshot.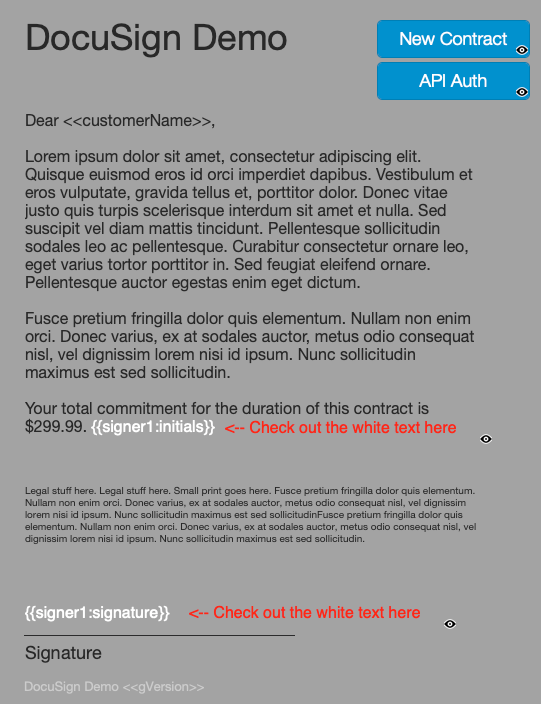
Save as PDF and Upload to DocuSign
We’ll use the Save Records as PDF script step to create a PDF from our layout and then upload this document to DocuSign via the API.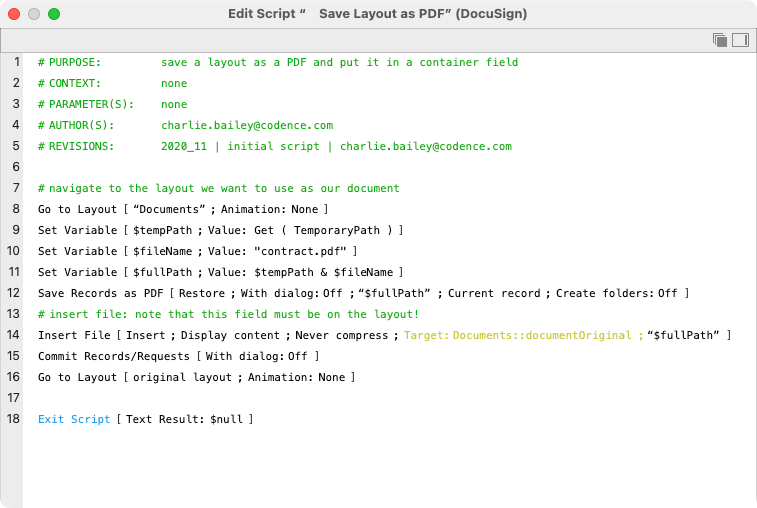
Uploading the document to DocuSign is arguably the trickiest part of this implementation. We need to do a bit of work to get this right. We’re going to need the name and email of the signer, our PDF (base64 encoded), and a JSON object that describes what DocuSign refers to as the envelope. An envelope is a collection of one or more documents for consideration by the signer. In this case, we have a single (PDF) document, and we need to define the properties of the envelope which is going to include this document.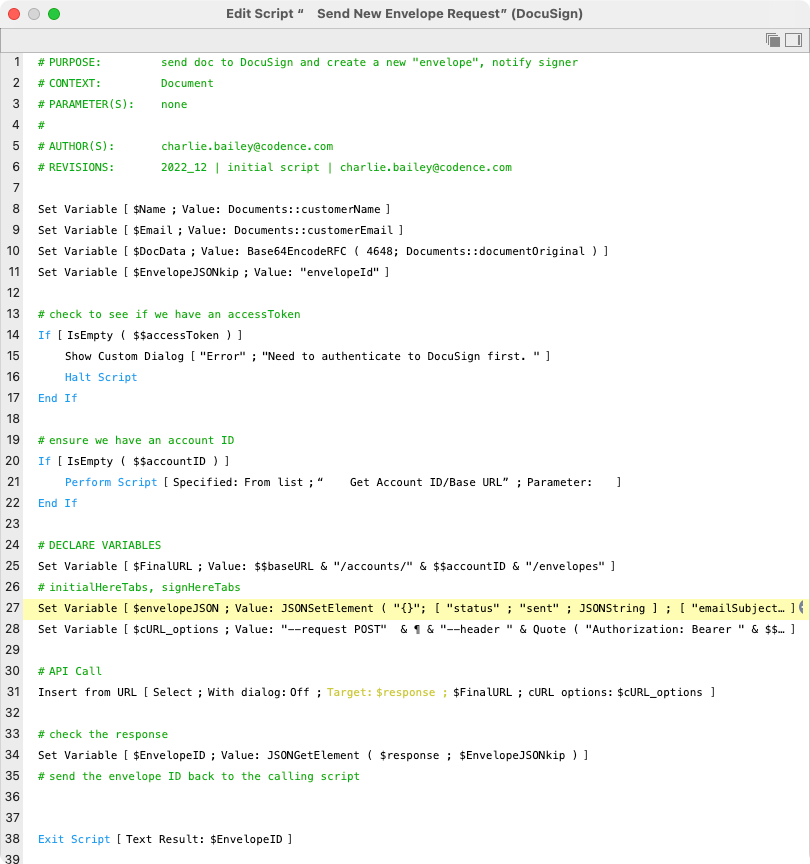
Our envelopeJSON object includes elements describing the status of the envelope, and the name and email of the signer and the base64 encoded document itself. Note that the documents and recipients elements are actually arrays that allow multiple items. In our example, we’ve got the one document and the one recipient, but these arrays can be extended as necessary. The recipients element includes the signer name and email address, and also the tabs element where we define the anchorString and the placement of the DocuSign element relative to the anchorString when DocuSign interprets our document for display to the signer.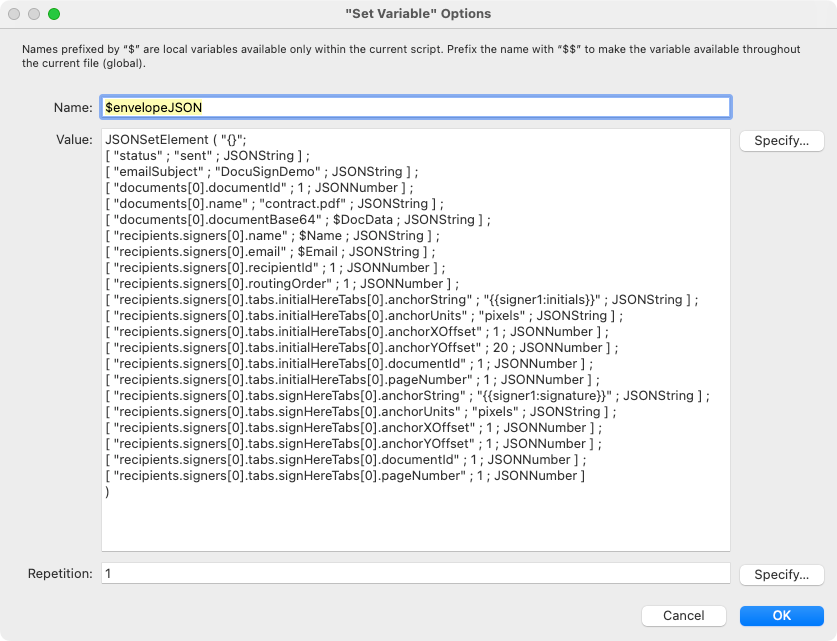
This envelopeJSON object gets used in the definition of our cURL options; note that we also need to include our access token.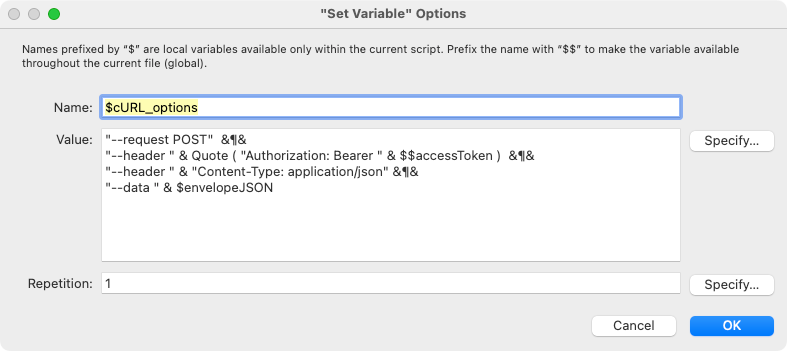
This all gets assembled into our API request which we execute with the Insert from URL script step on line 31 in the script above. If everything goes well, we should receive a JSON object in our reply of the form:
| { “envelopeId” : “8c419625-6399-451a-837c-83ddb713b1de”, “status” : “sent”, “statusDateTime” : “2023-01-04T17:08:57.0830000Z”, “uri” : “/envelopes/8c419625-6399-451a-837c-83ddb713b1de” } |
We will need the envelopeId for any future requests for this envelope, the status indicates that the signer has been notified by email, and the timestamp indicates when the signer was notified.
What Just Happened?
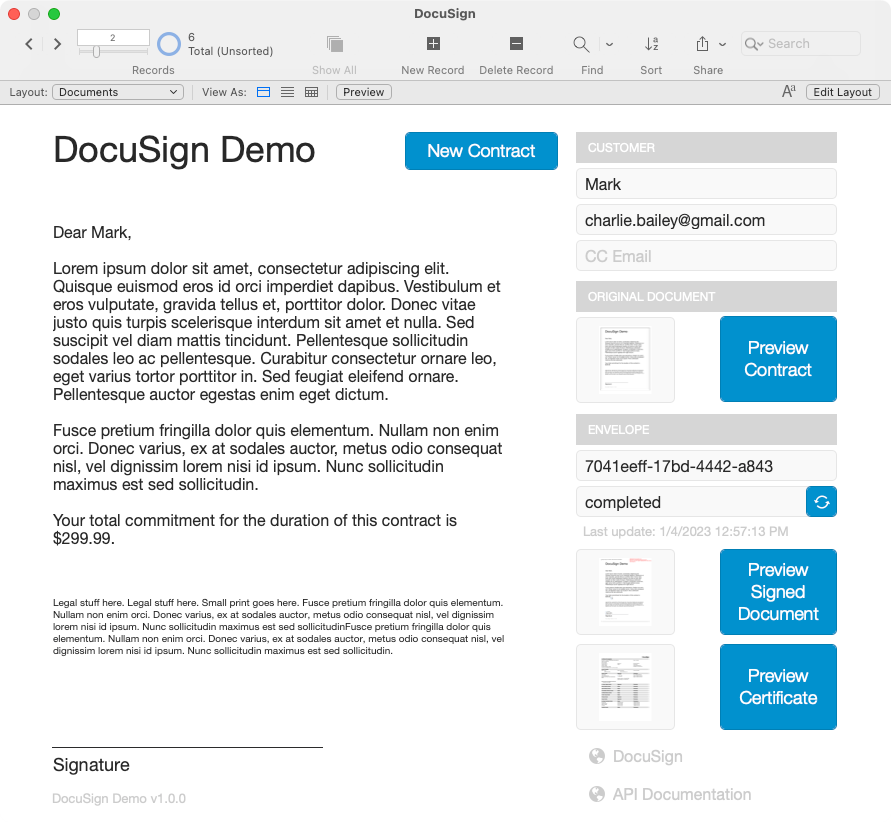
If we make a successful call to the API, we’ll get a verbose response which includes all sorts of detail about our envelope. The one item that we’re interested in is the status element near the bottom. A status of completed lets us know that the signer has successfully signed our contract.
|
{
“allowComments” : “true”, “allowMarkup” : “false”, “allowReassign” : “true”, “allowViewHistory” : “true”, “anySigner” : null, “attachmentsUri” : “/envelopes/cefa6f2e-28be-4d47-aca7-e291ed9a5eab/attachments”, “autoNavigation” : “true”,
“brandId” : “d43efc79-750e-4155-98c9-a849c9f73f97”, “burnDefaultTabData” : “false”, “certificateUri” : “/envelopes/cefa6f2e-28be-4d47-aca7-e291ed9a5eab/documents/certificate”, “completedDateTime” : “2023-01-04T17:35:49.6530000Z”, “createdDateTime” : “2023-01-04T17:35:25.3930000Z”, “customFieldsUri” : “/envelopes/cefa6f2e-28be-4d47-aca7-e291ed9a5eab/custom_fields”, “deliveredDateTime” : “2023-01-04T17:35:43.3900000Z”, “documentsCombinedUri” : “/envelopes/cefa6f2e-28be-4d47-aca7-e291ed9a5eab/documents/combined”, 17 “documentsUri” : “/envelopes/cefa6f2e-28be-4d47-aca7-e291ed9a5eab/documents”, “emailSubject” : “DocuSignDemo”, “enableWetSign” : “true”, “envelopeId” : “cefa6f2e-28be-4d47-aca7-e291ed9a5eab”, “envelopeIdStamping” : “true”, “envelopeLocation” : “current_site”, “envelopeMetadata” : { “allowAdvancedCorrect” : “true”, “allowCorrect” : “true”, “enableSignWithNotary” : “true” }, “envelopeUri” : “/envelopes/cefa6f2e-28be-4d47-aca7-e291ed9a5eab”, “expireAfter” : “120”, “expireDateTime” : “2023-05-04T17:35:26.3470000Z”, “expireEnabled” : “true”, “hasComments” : “false”, “hasFormDataChanged” : “false”, “initialSentDateTime” : “2023-01-04T17:35:26.3470000Z”, “is21CFRPart11” : “false”, “isDynamicEnvelope” : “false”, “isSignatureProviderEnvelope” : “false”, “lastModifiedDateTime” : “2023-01-04T17:35:25.3930000Z”, “notificationUri” : “/envelopes/cefa6f2e-28be-4d47-aca7-e291ed9a5eab/notification”, “purgeState” : “unpurged”, “recipientsUri” : “/envelopes/cefa6f2e-28be-4d47-aca7-e291ed9a5eab/recipients”, “sender” : { “accountId” : “d20952b8-eed1-4f09-8ccd-8d978a9f9179”, “email” : “charlie.bailey@gmail.com”, “userId” : “4076a501-c57d-4e28-9ce3-a40fac93dee6”, “userName” : “Charlie Bailey” }, “sentDateTime” : “2023-01-04T17:35:26.3470000Z”, “signerCanSignOnMobile” : “true”, “signingLocation” : “online”, “status” : “completed”, “statusChangedDateTime” : “2023-01-04T17:35:49.6530000Z”, “templatesUri” : “/envelopes/cefa6f2e-28be-4d47-aca7-e291ed9a5eab/templates” } |
We’ll update our local FileMaker record appropriately and then retrieve the signed document from DocuSign. We’ll need to make another API request to get the documentId(s). As before, our URL endpoint includes our account id and the envelopeId for this specific set of documents, and our cURL options just includes our access token. We loop through the list of documents and place them in their respective containers.
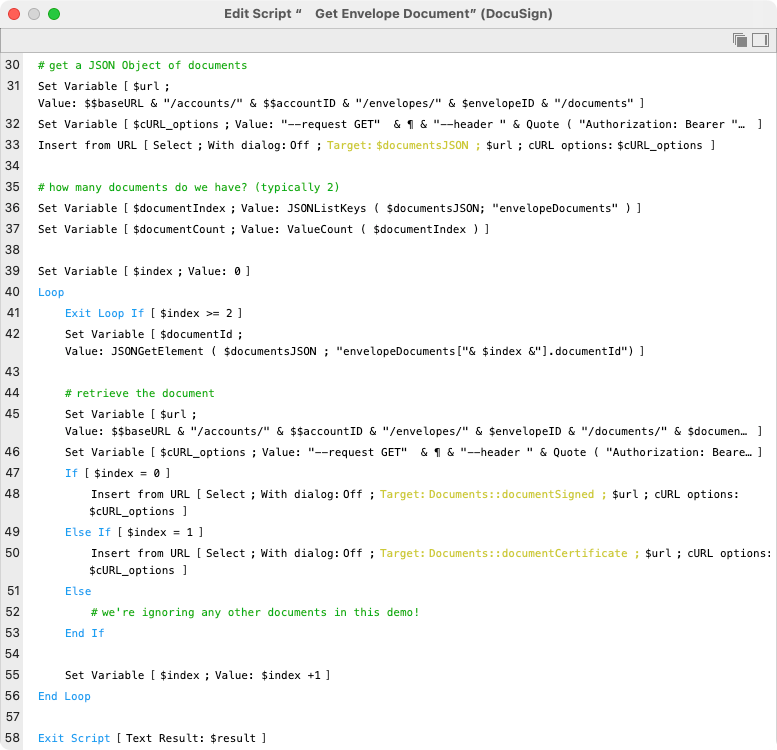
Once we retrieve these documents, we’re done! Though it took a while to explain this all, the entire process takes just a few seconds to complete – the slow step is waiting for the signer to complete their process.
Business Agility
The DocuSign API give you access to virtually any feature available on the DocuSign platform, but even a simple integration like the one described above can bring incredible efficiency to your daily workflows. Even if you’re processing just a handful of documents per week, you can likely save hours of work by integrating your custom Claris FileMaker solution with DocuSign. Give it a go and let us know what you think. If you need a push in the right direction, we’re happy to help, or let us know what you need and we can code the integration for you.
Comments
Leave a comment
Built with you in mind
Speak to one of our expert consultants about making sense of your data today. During
this free consultation, we'll address your questions, learn more about your business, and
make some immediate recommendations.


Regarding including the version number in the URL, it’s been my practice to include the /v2.1 for these requests. Some API’s allow you to substitute ./latest but I haven’t dug into the DocuSugn API docs to determine if that’s an option here.
Harold – thanks for the feedback. As you mentioned more recently, you can indeed include the base64 encoded document with your envelope creation request.
Further to my last comment, you can ignore it. The problem turned out to be an issue with the cURL. I had to use the Quote ($envelopeJSON) to get it to work.
FYI, Docusign now insists on having the version number in the URL:
https://demo.docusign.net/restapi/v2.1/
Didn’t work without it.
Now I just have to figure out how to add date fields, which shouldn’t be too difficult. I assume it’s similar to initials and signatures.
Thanks again for the blog
A quick question.
I have not been able to get this to work and Docusign support seems unable to help. I get a content length error. According the description above you create the envelope at the same time as you upload the PDF. From what I see in their documentation (v2.1) the envelope needs to be created first and then, once we have an envelope id, we can run an update request to send the document. Can you confirm this is the case. If so, that is missing from your explanation.
Thanks.
Is it possible to get a copy of this demo file. There is a lot of script info missing in order to integrate this into a solution.
Harold – we don’t (yet) have a demo file available for this system. Is there something specific that you’re stuck on? I’d be happy to point you in the right direction.